After a successful installation, the Transformation/Mabadiliko exhibition is up and running and awaiting its visitors. There's already been much excitement at the dynamism of the exhibition - moving pictures, music and a story of international collaboration writ large on the walls of the Zandra Rhodes Gallery. We're looking forward now to Monday's Private View - we hope to see you there.
Private View 14 March, 5-7pm 11 March – 22 April 2016 Zandra Rhodes Gallery, University for the Creative Arts, Rochester, Kent
Private View 14 March, 5-7pm
11 March – 22 April 2016
Zandra Rhodes Gallery, University for the Creative Arts, Rochester, Kent
Entry is FREE.
For this project, a series of graduates from the BA in Computer Animaton Arts (Rochester) have been invited to respond to the winning artworks of the MASK Prize, a creative competiition for schools and young people under the age of 25 in Kenya. Each animator has worked with one selected artwork and produced a short animation based on it. This initiative constitutes a unique creative exchange between young artists in Kenya and recently graduated animators in the UK.
In order to allow communication between practitioners in the two countries, the following blog has been set up. This tool facilitates exchange between the original creators of the artworks and the animators working with them now, and it will also function as a record of the creative process behind each animation. Extracts of the on-going conversations will also be on view at the gallery.
Image above: Greener Pastures and the Colours of Youth by Churchill Ongere. Animation by Emily Clarkson.
Here I post the final animated version of Greener Pastures and the Colours of Youth. However there is room for last minute changes. If anyone spots anything that feels wildly out of place, please leave a comment!
The final render of Adore Woman before adding sounds. I only just now noticed a little problem with the boil lines that needs fixing, but apart from that I mark this part done. Any feedback and comments before final pushes will be much appreciated. Thank you!
Here is the draft animation, from this point there needs to be keyframes + inbetweens added in and have the characters coloured in. But this demonstrates how the overall animation has been planned to play out so far
Although for those of you that saw the first draft I posted the other day, it hasn't changed a great deal. In fact, you may not even notice the differences, but they're definitely there.
This has been one of the most enjoyable and rewarding projects I've ever worked on, although it took me a little while to find my way into the project. The original artwork is incredibly detailed, so the prospect of modelling and animating everything seemed daunting. It wasn't until the last week when the animation finally came together, and when it did, I can say that I am pleased with how it came out.
A playblast of the head animation. The beginning is a steady model because of the transition from 2D to 3D. So far it's the neck, blink and a bit of jaw which means I still need to add eyebrows, mouth and general facial animation.
Here it is. The final animation - also doubling as the first draft animation too! Although when I say final, I don't mean it's the final high quality render of the animation; it's just the animation itself that is pretty much final, bar a few last minute tweaks (some of which I have already made, but I didn't have time to re-render).
The following video shows three short simple animation tests. Basically it's me having a bit of fun after all of the tricky sculpting.
None of these animations are overly complex to set up. Much can be achieved with some of Maya's most basic deformers such as the sine and flare deformer.
The next post will be some time during the week before Fridays deadline. It will feature the first draft animation where all the sounds, camera and animations finally come together. That should leave some time to receive feedback and polish things.
This is how the project is looking at the moment. There are still few timing issues and obviously things to add, although I believe it's good to share the progress and ask for comments and feedback.
It's by no means the finished article, but I have made further progress in bringing this fascinating picture into 3D. It's almost finished, so here's another demo of the 3D scene. And just to reiterate, this is not an animatic.
If you're wondering why the textures are a bit pixelated, I had to cap the texture resolution of this preview to 2K because my graphics card doesn't have enough memory to display several 8k textures at once. This shouldn't be a problem when it comes to final rendering though.
So in the end, I have resorted to good old fashioned sculpting. I realised that displacement mapping didn't give me enough control, and so it wasn't worth trying to fix all of the problems it created.
However, sculpting turned out to be a mini adventure in itself. You see, I wanted to be able to sculpt using the projected texture as a guide. Unfortunately, there were a few issues which made sculpting tricky.
Firstly, Maya's newest sculpting tool-set doesn't appear to work with projected textures (maybe it's a graphics driver issue, but I'm not sure), so I would have to sculpt blindly if I used it, and Maya's classic sculpting brushes are painfully slow to use on high resolution meshes. In both cases though, there was one missing feature which I wanted them to have that would make my life so much easier.
I wanted to be able to sculpt the mesh in such a way that the individual vertices could only move closer or further way from the projection camera. I overcame this problem by writing my own sculpting brush.
Notice how I can sculpt the mesh towards and away from the camera, but also notice how the vertices never appear to move from the cameras view point.
It's worth noting that Maya's classic sculpting tools appear to have an option for sculpting in the direction of the camera, but it doesn't work correctly. It's either broken or has a been labelled misleadingly. Maya's newest tool-set has the option too, and it even works in the same way as demonstrated with my tool, except with one caveat. It doesn't allow you to pick the projection camera, it only ever uses the current view-port. This of course means you can't really see what you're doing in 3D unless you have two view-ports open all the time.
I initially wondered whether it was worth the time and effort to create a tool for this specific use-case, but I think the results show that it has paid off.
There's just one Monday left before the deadline and there's at least one aspect of the animation I haven't properly considered yet, and that is the sound-scape. My only thoughts on the subject have been about creating a sound-scape out of sounds alone (not music). So keeping things relatively muted, and using the sounds of the various materials used in the picture (newspaper, paints, sculpting clay etc), to add texture to the piece.
This is the opening sequence so far. I am still unsure about the colours dripping from the top of the picture but I might adjust it later, when majority of the animation is completed.
The 'leak' of colour has been done by use of Maya particles and multiple AE effects.
Seeing as I had already kickstarted movement with the rendered run previously, I decided to work into the animation and match it to my animatic and the music. I went on to create the next sequence of motions beyond the introduction. The scene following what has been created thus far still needs work. New versions of that section will appear over the coming days as I work out what suits the scene best. in the meantime feedback on the movement would be greatly appreciated!
After opting to use Surface Shaders instead of mia_material_x Shaders, it was pretty apparent that, whilst the flat colour looked good, it still needed something to break the colour up a bit.
After my previous tests, I'd decided that I wasn't too keen on how traditional texturing looked in this instance. Instead, I've tried texturing in After Effects instead, using overlays of various textures to give the impression that the animation is actually a moving painting on a flat plane.
In Fahima's painting, the image is made up of several different materials, so I've attempted to emulate this diversity of materials in this test. To achieve this, I rendered out masks for each colour and then used each mask to isolate a unique texture. These were then used as overlays on the original video and the end result was the video above.
I really like the unique outcome of this combination of fixed textures and 3D models. I need to balance out the textures a bit, as some are a bit more jarring than others, however this is a pleasant outcome regardless. I am considering animating the textures somewhat too, just to break things up a little bit more.
Update: In response to Phil's comment, I have attempted to make the textures less static by animating them on twos.
I think this does a good job of keeping all the motion uniform, but I will still need to find a away of balancing out the textures in the final animation.
It took me a long while to work out how to get the elements rigged properly. But I finally made it! There are one or two elements I will have to work out later on during the animation, such as 'weighting' (for want of a better term) either the eye or the lips to the top of the nose stalk, so that when it bends around, the eye/lips follow along. I'll probably use a variant of locators with constraints but only when the scene calls for it.
In the meantime I started to animate the introduction of the animation to make sure what I've built works. I think it works! Though nailing down timing to the music is probably going to be my biggest challenge. Especially when occasionally the playback is offbeat! The animation is not bad for a first attempt though!
The full rig and all its controls
Please forgive the strange ratio of the video. I tried out creating a 'canvas' that closer matched the original artwork. For the main event I shall evolve the artwork from a portrait into a landscape for the sake of animation. I will also have recreate d the original artwork background as a layer in After Effects... its on the to do list!
Getting the 3D scene ready for creating the animation is taking a little longer than expected. Every time I think I'm getting somewhere, something comes along and makes things a little more difficult.
One of the shortcomings of the very first test piece was the cramped field of view and the restrictiveness of the camera animation. The camera needed the portrait aspect ratio and needed to be kept forward facing in order to stop the bounds of the picture showing. Also, the displacement effect broke down at extreme angles, meaning that an image like this would have been impossible to create:
However I have now overcome those problems by making the picture bigger, with the help of Photoshop's magical 'content aware' filter and clone stamp tool. The image is split into even more layers that last time, but most importantly I have taken care to keep the original part of the image intact.
Left: the original / Right: expanded image
The latest issue I am facing (which is why I've held the animatic off for a bit longer) is that I can't actually animate anything (other than the camera) until I've baked the projected textures to the 3D meshes. It turns out that baking textures is a rather slow process... Almost as slow as final rendering. I was hoping to make a rough draft with simplified elements, but since I don't want to bake everything twice, I am now reluctant to start baking the textures until I've got the models sculpted / displaced exactly how I want them. I want to get it right first time.
But in the meantime, here's another quick fly through video which shows just how much of the picture I will be able to explore (note: I haven't applied the full displacement effect here. Everything is on flat cards positioned in 3D and slightly warped to give the impression of 3D):
I think I'm still OK for time though. I can allow one more week to get the animatic done (it will be the first official draft animation). Then I will have another week left to revise things based on the feedback I get (as well as final polishing), and one final week (until Friday) to get it rendered and put together.
I admit I was rather hoping to get an animatic done a couple of weeks ago so as to leave more room for a discussion. As usual things got complicated!
Here is the second piece of artwork allocated to me for this project. This painting is by 9 year old Shela Forster.
I sent questions to Shela's mother to find out about this painting. As of yet I've not had any information, but I'll include the questions here to show what kind of information I was interested in finding out.
1) Can you tell me what your artwork is about?
2) What materials did you use to create your artwork?
3) Can you describe any specific details about what is going on in the picture?
(for example : What are the women doing? Are they going on an adventure? Is the giraffe eating? Is it looking at something? Is this a sun rise or a sun set? Where are the women going to or coming from? Where are they now? What sounds would you hear?)
4) What would you like to see in this animation when it comes to life?
(for example : How should it feel? What would you like to happen in the animation? How would you like things to move around?)
The direction I'm looking to take this piece in is a very painterly style, so it gives the impression that the animation has been made of slides of watercolour paints to tell a short story. This should give a very fluid and colourful motion.
The style I've chosen to use to bring Allan's drawing to life will be a mixture of the two types displayed in the video clips below. I will keep the visual look of the characters as close to the original designs as possible. So the childlike formation of the elephants and the scratchy pencil lines will stay similar as they currently are, and I'll be figuring out how to make this work during the walk and run cycles of the elephants etc.
This drawing was created by 4 year old Allan Kiptoo
I've been in contact with Allan's Father who has been able to sit down with his son and go through my questions.
1) Can you tell me what your artwork is about?
1. First its all about mobilization for Wildlife Conservation in our country Kenya and around the world.
2) What materials did you use to create your artwork?
2. The materials used to create the artwork were just simple; plain paper, a simple sharpened pencil and colour crayons.
3) Can you describe any specific details about what is going on in the picture?
(for example : Is the big elephant protecting the little elephant? Are they playing?
Are they going on an adventure? What are the elephants looking at? Where are they?
What sounds would you hear?)
3. The bigger elephant is the mother and its leading the young one in search of water as you can see there is a shadow under them indicating that its probably its noontime. Now in the direction they are heading to they seem to have seen another group still going for the same so the mother is trying to slow down the pace to protect the young from any harm.
4) What would you like to see in this animation when the animals come to life?
(for example : How should it feel? What would you like to happen in the animation?
How would you like things to move around?)
4. When this animation comes to live i would like to see that real danger trying to happen to the young one so that I may learn how they adopt and do when faced by such challenge.
I've finally completed the rigging on the three characters and I'm pretty happy with how they've turned out.
mia_material_x Shaders
mia_material_x Shaders with Outline
As I was posing them, I had a quick look at how Surface Shaders would look in place of the mia_material_x Shaders that I've primarily been working with, and I'm pleasantly surprised by the outcome.
Surface Shaders
Surface Shaders with Outline
The flatter Surface Shader just seems to work way better when it comes to representing the painting (something I probably should have realised earlier, but I'm happy to discover either way). Whilst modelling the remaining environments, I'll experiment with using them for those too and see how it all comes together in the end.
Today I've been putting together the models for the Male, Female and Child characters. They've been pretty simple to thanks to their incredibly basic and similar shape.
I have also rigged and skinned the Female character, and the Male and Child characters shouldn't take too long to rig either.
This particular render, combining a Mental Ray colour render and an outline rendered with Maya Software, has me reconsidering my rendering strategy. This approach works quite nicely with the environments, but not so much with the characters, I feel. I may have to experiment with some flatter, more traditionally cartoony rendering methods to achieve something that feels at home with the painting.
I've driven myself a bit insane with environment modelling at the moment, so in the mean time, I've drawn up the orthographics for the characters that will inhabit this world.
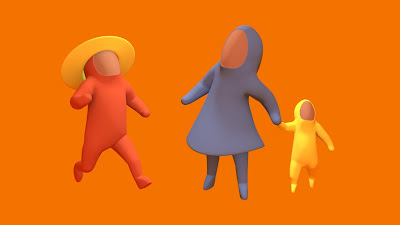
They are simplified versions of the characters that can already be seen in Fahima's painting. There are three human characters, a man in a hat, a woman in a bui-bui and a child (who's outfit I'm not entirely sure of...), each identifiable by their silhouette. This keeps their design simple and I can swap out the colours for a variety of people, whilst still keeping the characters distinctly recognisable.
Male Character
Female Character
Child Character
The design is also intended to make modelling quicker and easier, as they're more or less the same shape, with slight variations. This means I can create one character and simply adjust them for the other two, hopefully making things quicker for myself.
Update: I actually went ahead and started modelling the Female character immediately after posting these orthographics, below is the first hour or so of modelling (given their childlike design, I don't expect much refinement after this point. The model is already at a point that fits the specification.)
Today I have finally added some much needed colour to the Alleyway environment. The colour really sells the environment and I'm very happy with how things are turning out.
Alleyway Environment, Rendered in Mental Ray with Outlines
I have also rendered out the outline pass and composited it on top of a playblast to get an idea of how the outlines will appear when animated.
Playblast with Rendered Outlines
Whilst there are some imperfections with the outlines, I kind of like it that way, as it plays nicely with the handcrafted concept behind the animation.
For those waiting for a complete animatic, I expect to have something ready by the beginning of next week. Until then, what I have to show now is another animation/FX test; this time demonstrating a morphing effect.
We want to bring the sculptures in the picture to life, and one of the ideas we had for this was to try morphing them and mixing them up a bit. I have been in Photoshop, messing around with one of the sculptures and have made a new sculpture using features from the other sculptures in the picture.
Left: The original face / Right: The new face
Now that we have two versions to blend between, the next step is to morph one to the other. Cross-fading between the two images is the simplest way, but I want to go one better.
I want to distort the contours of each sculpture to fit the shape of the other sculpture as it blends between them. I've seen morphing effects done this way before and I know that it works well.
This was my first attempt:
It's may not be perfect, but it's getting there. These are the contours I drew for each image.
This next video shows the distortion that is applied to both images as they cross-fade. As the contours blend between the two targets, they're also controlling how the image distorts.
Left: The first face / Middle: deformation / Right: The second face / Bottom: The final effect
To further refine the effect I will need to think about creating one or more intermediate images to blend between (so each image is like a key-frame).
The contour effect demonstrated here was achieved in Maya using the wire deformer, blendShape deformer, and the deltaMush deformer. (although I've since found that the wrap deformer works better than the wire deformer.)
I suppose the next big question will be, how can I combine this with the 3D projection technique from last week? This is where things get interesting!
I'm hoping that these little test pieces are enough to understand the direction I'm going in until I'm ready to sort out an animatic. I wanted to find out what was possible before committing to any outlandish ideas!
I realise its been a while since I've posted, I got rather involved in working out how to rig each element as a separate entity. The leg and eye (I believe) have ben fairly straight forward, the thing I have been struggling with is the nose. It needs to sort of bounce walk and swing the stalk as well as the nostril legs. Its safe to say I have never attempted such a weird creature! I'm almost at the point of trying to group everything together and its all a massive experiment. But I'm working on it. I'm hoping the lips don't take me as long to rig.